Quick answer: Start with the core five in forged, sterilisable stainless steel: box-joint cuticle nippers, manicure scissors, precision slant-tip tweezers, a glass nail file and a dual-ended steel cuticle pusher — about £60-£90 together, or £120-£180 for a full first-year kit excluding a gel lamp. Skip the sub-£30 50-piece Amazon sets; they cannot hold an edge or be relied on professionally.
As you transition from the classroom to the salon floor, the single most important investment you will make is in your core set of professional tools. This is not about having the most extensive collection; it is about having the right tools, of the right quality. These are the instruments your VTCT or ITEC assessors will scrutinise during practical exams, the tools that will dictate the precision and quality of your work, and the first tangible evidence your clients have of your professionalism. A well-chosen, high-grade kit demonstrates a commitment to hygiene, technique, and results, forming the bedrock of your reputation from day one.
What makes a tool 'salon-grade'?
The distinction between an amateur tool and a professional, salon-grade instrument is not merely branding or price; it is rooted in material science and manufacturing. True professional tools are an investment, designed for longevity, precision, and—critically—sterilisation. Look for tools crafted from high-carbon stainless steel, hardened to maintain a sharp edge and resist corrosion. Favour tools that are 'forged' (shaped from a single piece of hot metal under extreme pressure) over those that are 'stamped' (cut from a sheet), as forging creates a stronger, more durable structure. Finally, examine the finish: blades should have a precise, hand-finished grind, and moving parts like joints should be smooth and perfectly aligned, ensuring they can withstand the rigours of daily use and repeated autoclave cycles.
The core five: start here
Before you even think about gels, acrylics, or intricate nail art, you must master the fundamentals of a perfect manicure. These five core tools are the non-negotiable foundation of your kit. Invest wisely here, and they will serve you for years.
Cuticle Nippers
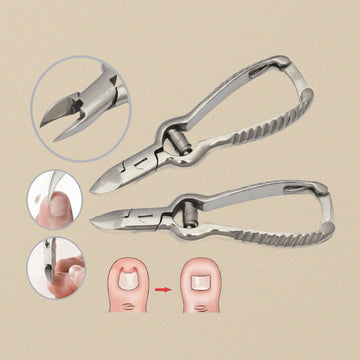
Your cuticle nipper is arguably the most critical hand tool you will own. The difference between a clean, professional-looking nail bed and a damaged, bleeding one often comes down to the quality of this single instrument. The primary distinction you will encounter is between forged and stamped nippers. Stamped nippers, often found in cheap kits, are made from two separate pieces of metal joined at a pivot. They lose their edge quickly, the joint loosens, and they cannot provide the precise, clean cut required. Forged nippers, by contrast, are created from a single piece of steel, offering superior strength, balance, and durability. They hold their edge for significantly longer and can be professionally sharpened.
When selecting a nipper, pay close attention to the joint type. A 'box joint', where one handle passes through the other, is far superior to a 'lap joint', where the two halves are simply laid over one another and riveted. The box joint provides stability and prevents the blades from twisting or separating under pressure, ensuring a consistently clean cut. You will also need to consider the jaw profile and length. A 'Russian' or 'tower point' profile features a very fine, straight, and narrow tip, ideal for the meticulous cuticle work seen in Russian manicures, allowing you to snip away tiny, individual pieces of non-living tissue with surgical precision. A more traditional 'French' profile has a slightly broader, more curved jaw. For a first kit, a nipper with a small jaw (3mm to 5mm) offers the most control for a technician still honing their skills.
Manicure Scissors
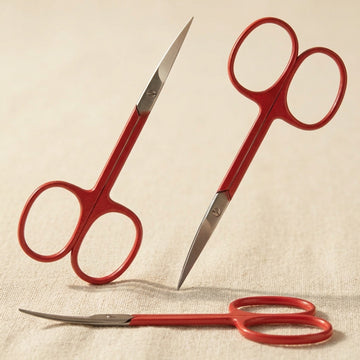
Whilst nippers are for cutting the non-living tissue of the proximal nail fold, manicure scissors are your tool for shaping the free edge of the natural nail and for detailed cuticle trimming. Again, quality is paramount. Look for stainless steel that can be fully sterilised. The choice between curved and straight blades depends on your primary use and personal preference. Curved blades are often favoured for cuticle work, as their shape naturally follows the curve of the eponychium, allowing for a smooth, continuous trim. They are exceptionally good for removing hangnails cleanly. Straight-bladed scissors offer unparalleled precision for shaping the free edge of the nail, particularly for creating sharp, straight sidewalls on a square or squoval shape. They are also invaluable for nail art, such as trimming foils or decals. For your first pair, consider a fine-tipped, curved 'tower point' scissor, as its versatility for both cuticle and detail work is unmatched.
Precision Slant-Tip Tweezers
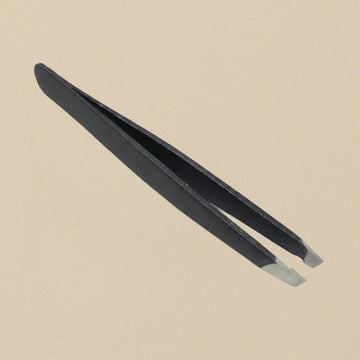
Your tweezers will become an extension of your hand, used for everything from brow shaping and stray hair removal to placing delicate nail art elements like gems and foils. Do not mistake the function of salon-grade tweezers with the cheap variety found in chemists. A professional pair must have perfectly aligned, hand-filed tips that meet flawlessly along their entire edge, without any gaps. This ensures they can grip the finest of hairs or the smallest of rhinestones without slipping. The 'slant tip' is the most versatile design for a beauty technician, offering a pointed end for precision work and a flat edge for gripping larger surfaces. Pay attention to the tension; the tweezers should close with minimal pressure to avoid hand fatigue during a long day of treatments, but have enough resistance to grip securely. High-quality stainless steel is essential, as it will not bend or lose its alignment and can be properly disinfected and sterilised between clients.
Glass Nail File
It is time to discard the notion of disposable emery boards as your primary filing tool. Whilst useful for specific, single-use tasks, your main file should be a professional glass (or crystal) file. The difference lies in how they work. An emery board is essentially sandpaper on a stick; it rips and tears at the keratin layers of the nail's free edge, which can lead to peeling and weakness. A glass file, on the other hand, has a uniform, etched surface that grinds the nail edge to a smooth, sealed finish. This effectively closes the keratin layers, promoting stronger, healthier nail growth. From a business perspective, a high-quality glass file is a sound investment. It will not wear out, can be completely sanitised and disinfected (or even autoclaved, depending on the manufacturer), and offers a superior, more comfortable experience for the client. It demonstrates a commitment to nail health that discerning clients will absolutely notice and appreciate.
Steel Cuticle Pusher
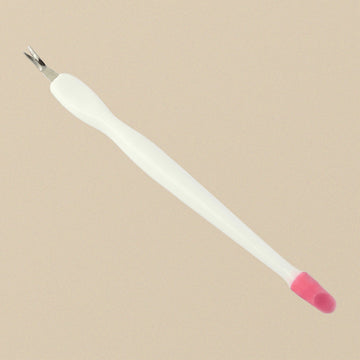
A dual-ended, stainless steel cuticle pusher is a non-negotiable workhorse. Forget flimsy plastic or wooden alternatives for your primary prep work. One end should feature a curved 'spoon' shape, perfectly contoured to gently push back the eponychium (the living tissue often mistaken for the cuticle) from the nail plate. The other end is equally important: it should be a sharpened, blade-like scraper (sometimes called a pterygium remover). This end is used to carefully and gently remove the true cuticle—the thin layer of non-living, transparent tissue that grows on the surface of the nail plate. Properly removing this tissue is essential for product adhesion and preventing lifting of gels or enhancements. A steel tool provides the necessary firmness and control for this delicate task, and its non-porous surface means it can be fully sterilised, a critical hygiene standard that wooden sticks cannot meet for this purpose.
Add at month 2-3
Once you have mastered your core five tools and are comfortable with basic manicure and pedicure procedures, you can begin to expand your kit. A good quality nail buffer set, with various grits for smoothing ridges and creating a high-gloss shine, is a logical next step. You will also need a set of sanitisable brushes for applying treatments, masks, or even for basic nail art. Whilst disposable orange-wood sticks have their place for cleaning under the free edge or correcting polish mistakes, they are not a substitute for your steel pusher. If you plan to offer gel polish services—a commercial necessity in today's market—a reputable, professional-grade LED gel lamp is a significant but essential investment. Ensure it has a reflective interior and sufficient wattage to cure products from all major professional brands.
What you don't need yet
It is easy to be tempted by the vast array of advanced tools and decorative supplies on the market, but discipline is key when building your first kit. You do not need a branded electric file (e-file) until you have completed specific, certified training for its use. Improper e-file use is a leading cause of nail damage, and it is a skill that must be formally taught, not self-learned. Likewise, resist the urge to buy huge decal sets, dozens of glitter pots, or a vast collection of expensive, branded polishes. Start with a core collection of classic colours from a reliable, professional-only brand: a pillar-box red, a nude, a classic pink, a deep berry, and a pure white. Build your collection based on client demand, not on fleeting trends. Focus on perfecting your prep and application with your core tools first; flawless execution of the basics will build your reputation far more effectively than a drawer full of unused glitter.
Sterilisation matters
This is the most important lesson you will learn: you cannot compromise on hygiene. Check what your insurance policy requires on hygiene, and follow it. For reusable metal tools like nippers, scissors, and pushers, this means proper sterilisation. A UV cabinet is not a steriliser; it is for storing already-sterilised tools. True sterilisation, the complete destruction of all microorganisms, requires an autoclave, which uses high-pressure steam. This is the gold standard and a worthwhile investment for any serious technician. All non-porous tools must be cleaned of debris, disinfected in a solution like Barbicide, and then sterilised in an autoclave after every single client. Porous, single-use items like orange-wood sticks or emery boards must be discarded after one use. This is not optional; it is a fundamental requirement of your profession.
Budget reality
Building a professional kit requires a realistic budget. For the core five high-quality steel tools and a glass file, expect to invest approximately £60-£90. To build out your full first-year kit with buffers, brushes, a basic polish collection and other essentials, a budget of £120-£180 is a practical starting point (excluding a gel lamp). Be extremely wary of the large, 50-piece manicure sets sold on Amazon and other online marketplaces for under £30. These are invariably made from low-grade, stamped metal that will not hold an edge, will rust, and cannot be relied upon for professional work. You will end up replacing them within six months, costing you more in the long run. Adhere to the principle of "buy once, buy well". A single pair of forged stainless steel nippers will outlast a dozen cheap alternatives.
UK-stocked, fast dispatch
When you need a replacement tool or want to expand your kit, you cannot afford to wait for long international shipping times. At Toolsmith Ltd, all our professional-grade beauty and nail tools ship from UK stock; we aim to dispatch orders placed before 2pm UK time, Monday to Friday, the same working day. Beauty and nail schools equipping a whole class can order through our trade accounts for beauty and nail schools.
Related guides
- For Beauty & Nail Schools — bulk trade orders
- Cuticle Tools Explained: Pushers, Nippers & Trimmers
- Pedicure Foot Files, Rasps & Callus Removers
- Eyelash Curlers: How to Choose and Use One
- Wet Shaving with a Safety Razor: A UK Starter Kit Guide
- Shop all Beauty & Nail Tools
- Nail Drill Bits Explained: A Guide for UK Nail Techs
Frequently asked questions
What tools do I need in my first professional nail technician kit?
Five core tools: forged box-joint cuticle nippers (a 3-5 mm jaw gives most control), fine-tipped manicure scissors, precision slant-tip tweezers, a professional glass nail file and a dual-ended steel cuticle pusher with a spoon end and a scraper end. These are the instruments VTCT and ITEC assessors scrutinise, and all can be fully sterilised between clients.
How should nail tools be sterilised between clients?
Reusable metal tools must be cleaned of debris, disinfected in a solution such as Barbicide, then sterilised in an autoclave after every client — a UV cabinet only stores already-sterilised tools, it does not sterilise. Porous single-use items like orange-wood sticks and emery boards are discarded after one use. Check what your insurance policy requires on hygiene.
Do I need an electric nail file when starting out?
No. Don't buy an e-file until you've completed specific certified training for it — improper e-file use is a leading cause of nail damage, and it's a skill that must be formally taught, not self-learned. Focus first on flawless prep and application with your core hand tools; perfecting the basics builds your reputation faster than any gadget.