Quick answer: Buy a round set first — a 7-hole 3–13mm set (£21.99) covers earring pads, bezel backs and pendant blanks and is the workshop workhorse. Add oval, heart or multi-shape sets (£99.99) as your designs demand. Always anneal and lubricate the metal, work on a steel bench block, strike once firmly with a brass mallet, and respect the roughly 1.0mm thickness limit.
If you work with sheet metal, the disc cutter is one of those tools that, once you have it, you'll wonder how you ever managed without it. For anyone who has spent hours hunched over a bench peg, painstakingly sawing out circles with a jeweller's saw, the ability to punch a perfectly clean, round blank in seconds feels like a superpower. It’s a fundamental upgrade to your workflow, saving you time, reducing finishing work, and delivering a level of consistency that is difficult to achieve by hand.
Last updated: 18 May 2026.
But with a growing variety of shapes, sizes, and price points on the UK market, choosing the right set can be daunting. This guide is written from the bench, for the bench. We'll cut through the noise and focus on what you actually need to know to invest in the right disc cutter, use it correctly, and keep it in prime condition for years of service.
What Exactly Is a Disc Cutter?
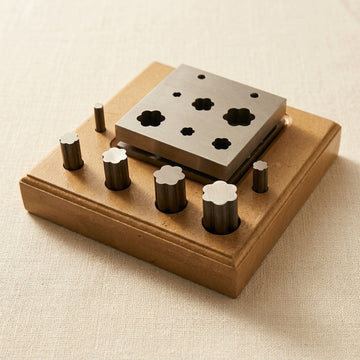
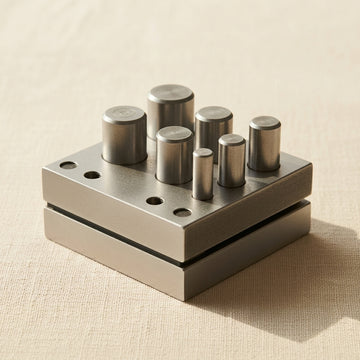
At its core, a disc cutter is a simple, robust tool designed for one job: shearing a precise shape from a sheet of non-ferrous metal. Its anatomy is straightforward. You have a heavy, hardened steel block (the die) with a series of precisely machined holes passing all the way through. For each hole, there is a corresponding hardened steel punch, machined to fit the hole with an extremely tight tolerance. Think of it as a high-precision, industrial-grade hole punch for metal.
The process is brutally effective. You place your metal sheet between the block and the punch, and deliver a firm strike to the top of the punch with a brass mallet. The force drives the punch's cutting edge through the metal sheet, shearing a "blank" or "disc" which falls through the hole. The result is a clean-edged shape, ready for the next stage of its journey—be it the back of a bezel setting, a blank for a charm, the base for an earring post, or a component for a more complex piece.
This tool is a cornerstone of a productive workshop, sitting alongside your files, pliers, and soldering torch as one of the essentials. If you're just starting out, we cover where it fits into a broader toolkit in our guide to Setting Up a Jewellery Bench.
The First Investment: The Round Disc Cutter
If you buy only one disc cutter, it should be a round one. The circle is the most fundamental shape in jewellery making, and a good round set is the undisputed workhorse of the workshop. From tiny discs to form earring posts to larger blanks for pendants or the base of a cabochon setting, you will reach for this tool constantly.
Choosing Your First Set
For most jewellers, a set that covers a range from small to medium is the most practical starting point. Our 7-Hole Round Disc Cutter Set 3-13mm (£21.99) is a perfect example of a versatile entry-level set. Let's break down what those sizes mean in practical terms:
- 3-5mm: Ideal for creating the small pads for soldering onto earring posts, small decorative elements, or granulation-style details.
- 6-10mm: This is the sweet spot for the backs of most standard bezel-set cabochons. You can also use these to create washers for rivets or blanks for small charms.
- 11-13mm and larger: These sizes are perfect for medium-sized pendant blanks, components for larger earrings, or the base plates for bigger bezel cups.
The beauty of a disc cutter is the perfect blank it produces. This blank is often the starting point for other processes. For instance, a perfectly flat 10mm disc is the ideal starting point for creating a domed component. You can take your freshly cut blank straight to a dapping block to form it into a hemisphere. We explore this technique in depth in our Doming & Dapping guide. This synergy between tools is what makes for an efficient and professional workflow.
Expanding Your Shape Vocabulary: Ovals, Hearts & Decorative Sets
Once you've experienced the speed and precision of a round disc cutter, you'll inevitably start to see the potential for other shapes. Moving beyond the circle opens up a huge range of design possibilities, allowing you to create more distinctive and complex work with the same efficiency.
The Versatile Oval
After the circle, the oval is arguably the most useful shape for a jeweller. It’s the go-to for setting the vast majority of non-round cabochon stones. Trying to saw a perfect oval by hand is a true test of patience and skill; a disc cutter makes it a ten-second job. Ovals are also fantastic for creating signet-style ring tops, elegant pendant blanks, and elongated bracelet links. A quality set like our Oval Disc Cutter Set 4-16mm (£99.99) provides a range of sizes that correspond to common oval stone calibrations, saving you hours of filing to get a bezel to fit.
The Expressive Heart
Whilst perhaps not an everyday shape for all jewellers, the heart shape has enduring commercial appeal. It's a staple for Valentine's, anniversaries, and children's jewellery. A Heart Disc Cutter Set 8-20mm (£99.99) allows you to produce perfectly symmetrical hearts time and time again. They make excellent feature charms for bracelets, drop earrings, and central pendant elements. Having the ability to quickly punch out a range of heart sizes can make producing a themed collection a far more profitable venture.
Creative Flourishes: Flower and Multi-Shape Sets
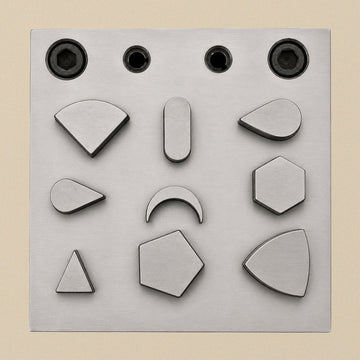
This is where you can truly start to build a library of unique components. These sets are less about daily utility and more about high creative return on investment. A Flower-Shape Disc Cutter Set 7-22mm (£99.99) can be used to create floral elements for stacking, earring jackets, or decorative overlays on larger pieces. A Multi-Shape Disc Cutter Set (£99.99), which might include shapes like a teardrop, square, or star, gives you an instant toolkit for creating a diverse range of charms and findings. These pre-cut shapes can also be a fantastic starting point for other techniques. For example, a perfectly cut blank can be textured, stamped, and then used as a master pattern for reproduction via Lost-Wax Casting for Beginners, ensuring every piece in your cast run starts from a flawless, identical master.
The Golden Rules: Correct Technique for a Perfect Cut
A disc cutter is a precision instrument. Its performance and lifespan are directly related to how you use it. Abusing this tool will lead to frustration, damaged tools, and poor results. Follow these steps every single time, and your cutter will serve you well.
1. Preparation is Everything
- Anneal Your Metal: Before you even think about cutting, anneal your sheet metal. Heating the metal to a dull red and quenching it relieves internal stresses, making it soft. Cutting soft metal puts significantly less strain on both the metal and the cutting edges of your tool. It's the single most important step for getting a clean cut and prolonging the life of your cutter.
- Lubricate: A small amount of light oil or a dedicated cutting lubricant like Bur Life makes a huge difference. Apply a thin film to the cutting edge of the punch. This reduces friction, aids the shearing action, and results in a cleaner cut with less burring.
2. The Setup
- Solid Foundation: NEVER use a disc cutter on your wooden bench. It needs a completely rigid, unyielding surface. Place the cutter on a steel bench block. This ensures that 100% of your hammer's force is directed into the cut, rather than being absorbed by a soft surface. You can find suitable blocks in our Hammers & Forming Blocks collection.
- Position the Metal: Slide your annealed and lubricated sheet metal into the cutter. Ensure it lies perfectly flat.
- Select the Punch: Choose the correct punch for the hole you intend to use. Insert it into the corresponding hole, ensuring it moves freely.
3. The Strike
- Use a Brass Mallet: This is a non-negotiable rule. NEVER, EVER strike a hardened steel punch with a hardened steel hammer. Steel-on-steel impact will cause the top of your punch to "mushroom"—to deform and splinter. These splinters are brittle and can fly off with considerable force, creating a serious eye hazard. A softer brass mallet will deform itself before it damages the punch, which is exactly the behaviour you want. It's a safety-critical choice.
- One Firm Strike: The goal is to drive the punch through the metal in a single, confident blow. Hold the punch vertically with one hand (keeping fingers well clear of the top!) and deliver a firm, dead-centre strike with the other. 'Pecking' at it with multiple small taps will often result in a stepped or dished blank and can jam the punch.
- No Twisting: Do not twist the punch to try and 'help' it cut. The tool is designed for a pure shearing action. Twisting will damage the cutting edge and can chip the die.
Troubleshooting & Maintenance
Even with perfect technique, you may occasionally run into issues. Here’s how to diagnose and fix the most common problems.
Common Problems
- Ragged Edges or a "Lip" on the Blank: This is usually caused by one of three things: the metal was not annealed, the cutting edges are becoming dull, or the sheet metal is too thick for the cutter. Always check your annealing process first.
- The Punch is Stuck: This is a classic sign that you've tried to cut metal that is too thick. It can also happen if you fail to lubricate the punch or if your strike was off-axis, jamming the punch at an angle. To free it, turn the block over and tap the punch back out from the bottom with a wooden or nylon mallet. Do not be tempted to whale on it with a steel hammer.
- The Blank Comes Out Domed: This is the result of using multiple light taps instead of one firm strike. The first tap starts to deform the metal, and subsequent taps just stretch it further. Re-evaluate your striking technique—it requires confidence.
Essential Maintenance
Your disc cutter is made of high-carbon steel, which means it will rust if neglected. Maintenance is simple but vital.
After every session, wipe down the block and all the punches with a lightly oiled cloth. This displaces moisture and protects the steel. Store the set in a dry place, preferably in its original case or a dedicated drawer. If you notice a small chip on a cutting edge (often from an off-axis strike or hitting an impurity in the metal), it is possible to very gently hone it with a fine diamond file or sharpening stone. However, this requires a delicate touch to maintain the correct angle. For significant damage, professional resharpening is the only real option.
A Critical Note on Metal Thickness
Every disc cutter has its limits. It is absolutely critical that you respect them. The vast majority of standard disc cutter sets, including budget-friendly options, are designed to cut non-ferrous metals (silver, copper, brass, gold) up to a maximum thickness of around 1.0mm (18 gauge). Some more affordable sets may even struggle with that and are more comfortable at 0.8mm.
Attempting to cut sheet that is too thick is the number one cause of catastrophic tool failure. It will, at best, get the punch hopelessly stuck. At worst, it will chip the cutting edges, break the punch, or even crack the die block itself, rendering your investment useless. Heavy-duty disc cutters do exist that can handle up to 1.5mm (16 gauge) or even 2.0mm sheet, but they are a significant step up in price and construction. Always read the manufacturer's specifications for your specific tool and do not exceed them. And remember, these tools are for soft, non-ferrous metals only. Never try to cut steel sheet in a jeweller's disc cutter.
Choosing the right tool is the first step towards working smarter, not harder. A disc cutter is a prime example—an investment that pays for itself over and over in saved time and superior results. By understanding the different types, using the correct technique, and performing basic maintenance, you'll have a workshop companion that will deliver perfect blanks for years to come. Browse our full range of Jewellery Making Tools to find the perfect addition to your bench.
Related guides
Frequently asked questions
Which disc cutter should I buy first for jewellery making?
A round set. Circles are the most-used shape at the bench — earring pads, bezel-cup backs, washers, charms and pendant blanks. A 7-hole set covering 3–13mm is a versatile, affordable starting point; oval, heart, flower and multi-shape sets are worthwhile later additions for setting calibrated stones and building themed collections.
Why is my disc cutter punch stuck or cutting ragged edges?
A stuck punch usually means the sheet was too thick, unlubricated, or the strike was off-axis — turn the block over and tap the punch out with a wooden or nylon mallet, never a steel hammer. Ragged edges or a lip point to un-annealed metal, dulling cutting edges, or excessive thickness. Anneal, lubricate, and use one firm central strike.
How thick can the metal be in a jeweller’s disc cutter?
Most standard sets handle non-ferrous metals (silver, copper, brass, gold) up to about 1.0mm (18 gauge), and some budget sets are happier at 0.8mm. Exceeding the limit is the top cause of chipped edges, broken punches and cracked dies. Heavy-duty cutters manage 1.5–2.0mm, but steel sheet should never be cut in a jeweller’s disc cutter.