Quick answer: Buy Glardon-Vallorbe HSS graver blanks — an onglette, a flat and a knife first — with mushroom handles, a 600/1200-grit diamond plate and a £15 acrylic sharpening jig; around £90–£120 equips a serious student. Keep a cheap set purely for sharpening practice, and remember new blanks arrive unsharpened: a 45-degree belly, 15-degree heel and mirror polish do the cutting.
The hand graver. For many UK bench jewellers, it’s the gatekeeper skill separating basic assembly from the finer arts of stone setting and hand engraving. Many jewellers have a small collection rattling around in a drawer—a mix of inherited tools, student buys, and that one expensive graver bought for a specific job. In practice, most use just one or two of them constantly. That faithful onglette for bright-cutting a bezel, or the trusty flat for cleaning up a cast edge. Getting that tool to sing, however, is another matter entirely. It’s a skill born from practice, patience, and more than a few late nights resharpening a tip you’ve just snapped on a work-hardened collet. This guide is for every jeweller, student, and apprentice who wants to move beyond just owning gravers to truly mastering them. Here’s how to choose your first set, sharpen them to a razor’s edge, and keep them cutting cleanly, job after job.
The five hand graver profiles you actually need
Walk into any jewellery supplier and you’ll be faced with a bewildering array of graver profiles. Whilst there are dozens of specialist shapes, the vast majority of bench work in the UK can be accomplished with just five core profiles. Master these, and you’ll be equipped for almost anything.
Onglette (or Point Graver)
The onglette is the quintessential jeweller's graver. With its curved sides tapering to a very fine point, it has a cross-section like a pointed arch. This unique geometry allows it to cut fine, swelling lines with ease. For stone setters, it’s the tool for bright-cut and star settings, creating those brilliant, polished facets that make a diamond pop. For engravers, it’s the go-to for delicate scrollwork and fine lettering. Its sharp point allows for precise entry and exit from the metal, whilst the curved belly polishes the cut as it goes. If you only buy one good graver, make it an onglette.
Flat Graver
As the name suggests, the flat graver has a rectangular cross-section, creating a cutting edge like a tiny chisel. Whilst it’s used in engraving for creating bold lines, block lettering, and shading (known as "wriggle cuts"), its real value on a general jewellery bench is its versatility. A perfectly sharpened and polished flat graver is an indispensable tool for cleaning up the inside of bezels, removing file marks from tight corners where sandpaper can’t reach, and creating perfectly flat, bright-cut edges on geometric pieces. They come in various widths, from a hair's-breadth 0.2mm to a chunky 3mm. A No. 40 (1.0mm) is an excellent starting point.
Knife Graver
Often confused with the onglette by beginners, the knife graver has two flat sides that taper to a sharp point, giving it a triangular cross-section. It lacks the curved belly of the onglette, meaning it cuts a straight, sharp V-groove. This makes it the ideal tool for outlining designs before removing background metal, for deep, decisive lines in softer metals like silver and gold, and for fine cross-hatching. It’s a more aggressive tool than the onglette and is superb for creating definition and shadow in an engraved piece.
Round Graver (or Bullsticker)
The round graver has a semi-circular cross-section, and its cutting face is ground to a corresponding curve. This tool doesn't cut a line; it scoops. Its primary use is in stone setting, particularly for raising beads for pavé or grain settings. By pushing the graver into the metal, you can raise a small, polished bead of metal that will be used to secure a stone. It's also used by engravers to create rounded textures and to scoop out material when sculpting figurative work. A No. 52 or 53 is a common size for general setting work.
Square Graver
The square graver is the workhorse for deep, structural cuts. It’s a square bar of steel, typically sharpened on one of its 90-degree corners to create a 45-degree cutting face. This creates an incredibly strong point, perfect for stop-cuts at the end of lines, creating sharp corners in lettering, and for removing large areas of background metal. It is the preferred tool for hammer-and-chisel engraving, especially on signet rings, where its robust point can withstand repeated hammer blows to drive deep, clean cuts into steel dies or tough precious metals.
Brand reality: GRS vs Vallorbe vs Glardon vs budget sets
Let’s be frank about steel. The brand of graver you buy has a direct and profound impact on how long it holds an edge and how it feels in the cut. There’s a place for everything, but you need to know what you’re paying for.
Budget sets (about £8–£25): You’ve seen them online—sets of six gravers with wooden handles for less than the price of a single Swiss blank. Should you buy them? Yes, but with a massive caveat. The steel is typically soft, unhardened carbon steel. It will not hold a finely sharpened edge for more than a few cuts on brass, let alone silver or gold. Trying to bright-cut a platinum bezel with one is an exercise in pure frustration. However, they are absolutely brilliant for one thing: learning to sharpen. You can grind, shape, and polish these cheap gravers without the fear of ruining a £30 blank. Buy a set, destroy them on a diamond plate, and learn the muscle memory of creating a heel and belly. Then, put them away.
Glardon-Vallorbe (£25-£40 per blank): This is the professional standard. Glardon and Vallorbe are part of the same Swiss manufacturing group, and their names are used interchangeably. When a seasoned jeweller talks about a "Swiss graver," this is what they mean. They are typically made from High-Speed Steel (HSS), a fantastic material that offers a superb balance of hardness, toughness, and edge retention. It can be sharpened to an exceptionally fine, durable edge on standard diamond plates and will cut precious metals beautifully all day long. A Glardon HSS graver, properly cared for, is a tool for life. Most career engravers and setters build their entire collection from these.
GRS & Carbide Systems (£80+ per graver): GRS (Glendo Corporation) is famous for its power-assist engraving systems, and they also produce gravers from exotic materials like tungsten carbide. Carbide is incredibly hard—far harder than HSS. This means it holds its edge for an exceptionally long time, making it a favourite for production engravers working on hard materials like steel or platinum. However, this hardness comes with two downsides: it’s brittle, so a clumsy slip can easily snap the tip, and it’s a nightmare to sharpen without specialised equipment like a power hone with diamond wheels. For most UK bench jewellers, the cost and sharpening complexity of carbide are overkill. The consensus is clear: stick with Glardon HSS and learn to resharpen it well.
Handles: mushroom vs straight vs ball
The handle is your interface with the tool, and the right shape is crucial for both comfort and control. The graver blank is sold separately, and you fit it by shortening the tang and carefully hammering it into the handle.
Mushroom Handle: This is the classic, palm-sized handle that most UK jewellers favour. The rounded end nests comfortably in the palm of your hand, allowing you to generate significant, controlled power by pushing from your shoulder and core. Your fingers are used for guiding the graver, not pushing it. This is the best all-round handle for general bench work, from setting to heavy engraving.
Straight/Push Handle: These are longer, thinner handles, often octagonal or round, resembling a file handle. They are favoured by fine-line engravers doing delicate scrollwork. The handle is held more like a pen, allowing for exquisite control with the fingers. Power is minimal; it's all about finesse. If your work involves tiny, intricate patterns, a straight handle is worth trying.
Ball Handle: This spherical handle is often used in conjunction with an engraver's block (a heavy, rotating vice). The ball shape allows the engraver to roll the tool in their hand whilst simultaneously rotating the block, creating perfectly smooth, continuous curves. It’s a more specialist handle, but indispensable for those doing advanced scrollwork.
Sharpening: the part most beginners get wrong
A new graver is just a blank piece of steel. It is not sharp. It is not usable. The process of sharpening is what turns it into a precision cutting tool, and it is, without doubt, the single biggest hurdle for any new user. Get it right, and the tool will glide through metal like a hot knife through butter. Get it wrong, and it will skip, dig, and plough, ruining your work and your confidence.
The fundamental secret is this: a graver is sharpened on two main faces. The 'belly' (or face) is the surface that does the cutting. The 'heel' is a relief angle ground underneath the point. Without a heel, the graver has no clearance and will simply jam in the cut. The heel lifts the body of the graver, allowing only the very tip to engage with the metal.
The 45 / 15 Rule of Thumb: A brilliant starting point for an onglette or square graver is the 45/15 rule. First, you sharpen the belly of the graver at a low angle, typically around 45 degrees from the shaft. This creates the main cutting face. Then, you lift the graver much steeper, to around 15 degrees, and create a tiny, secondary facet right behind the cutting edge. This is the heel. The combination of these two angles gives you a strong, efficient cutting point.
Diamond Stone Progression vs Water Stones:
- Diamond Plates: This is the modern, fast, and clean method. A good progression is a coarse 320-grit plate for initial shaping (regrinding a broken tip), a 600-grit for general sharpening, a 1200-grit for refining the edge, and a 3000-grit for a pre-polish. They cut quickly and stay flat.
- Japanese Water Stones: The traditional choice. A combination 1000/6000 grit stone is a classic. They give a beautiful edge but require soaking, can be messy, and need to be flattened periodically.
GRS Sharpening Fixtures vs the £15 Acrylic Jig vs Freehand:
- Freehand: The goal for many, but a terrible place to start. It requires immense muscle memory to hold two precise angles consistently.
- The £15 Acrylic Jig: Your best friend as a beginner. These simple jigs hold the graver and have angled holes that you place a rod through, allowing you to lock in a specific angle (like 45° or 50°) as you slide it across your sharpening stone. It’s the best way to learn what a correctly angled face feels and looks like.
- GRS Sharpening Fixtures: These are high-precision, dial-in systems that cost hundreds of pounds. They offer ultimate repeatability and are designed to work with power hones. They are fantastic tools but are overkill until you are doing a significant amount of engraving.
The Final Polish: This is the step that separates a good edge from a great one. After sharpening on your finest stone, the edge will still have a microscopic burr. This burr will cause the graver to drag and stick. To remove it, you must polish the belly and the heel. A traditional hard Arkansas stone with a drop of oil works beautifully. Alternatively, a piece of plate glass with 0.5-micron diamond polishing film or paste will produce a flawless, mirror-finish edge. This final polish is what makes a graver glide effortlessly, leaving a cut so bright it looks like it's been polished.
The five-minute graver maintenance routine
You don't need to do a full regrind every time your graver feels a bit dull. A professional's speed comes from efficient maintenance.
Quick Touch-Up: Between jobs, or even during a long engraving session, the edge can lose its keenness. A few light strokes on your finest stone (1200-grit diamond or 6000-grit water stone), followed by a quick strop on your Arkansas stone or diamond film, is all it takes to bring the edge back to life. This takes less than a minute.
When to Fully Resharpen: If a quick touch-up doesn't work, or if you can see a tiny glint of light on the very tip (a sign it's rounded over), it's time for a proper resharpen. This means going back to your 600-grit stone to redefine the belly and heel, then working your way back up through the grits to a final polish. This might take five to ten minutes.
When to Regrind: You only need to regrind if the point has significantly chipped or broken, or if you want to completely change the profile of the graver (e.g., turning a wide flat into a narrow one). This involves going back to your coarsest 320-grit stone or a bench grinder to remove a lot of metal quickly before starting the sharpening process from scratch.
First-buy kit: £45-£180 progressions
Here are three sample kits to get you started, depending on your budget and commitment.
The "Sharpening Learner" Budget Kit (£45):
- One cheap set of gravers for sharpening practice (around £15).
- A basic acrylic sharpening jig (£15).
- A double-sided 400/1000 grit diamond plate (£15).
- Purpose: This kit is not for making jewellery. It's for learning the physical act of sharpening without fear. You will learn to create faces, heels, and polished edges.
The "BTEC Student/Serious Hobbyist" Standard Kit (£90-£120):
- Three Glardon-Vallorbe HSS graver blanks: Onglette No. 2, Flat No. 40, Knife No. 2 (£75).
- Three mushroom handles (£15).
- A 600/1200 grit double-sided diamond plate (£25).
- An acrylic sharpening jig (£15).
- Purpose: This is the workhorse kit. These tools, when sharpened correctly, are capable of professional-quality work and will form the foundation of your collection. This is the kit most apprentices and students should aim to build.
The "Pro Engraver" Starter Kit (£180+):
- Five-piece Glardon-Vallorbe HSS set (Onglette, Flat, Knife, Round, Square) (£125).
- Five mushroom or custom handles (£25).
- A GRS-style sharpening jig for precision (£50+).
- A full diamond plate progression (e.g., 320, 600, 1200 grit) and a polishing medium like an Arkansas stone or diamond film (£80+).
- Purpose: For the jeweller who is committing to hand engraving as a core part of their business. This setup provides the versatility and precision needed for high-end, demanding work.
Push graver vs hammer-and-chisel
How you power the cut is just as important as the graver's shape. The two primary methods are pushing and hammering.
Push Graver: This is the technique used for 90% of jewellery work. The graver, fitted in a palm handle, is pushed through the metal using body weight and controlled by the fingers. It allows for incredible nuance and control, essential for delicate tasks like bright-cutting around a stone, setting beads, or engraving fine lettering. The cut is smooth and continuous.
Hammer-and-Chisel: For deep, bold cuts, especially in large silver pieces or for creating the master for a signet ring, the hammer-and-chisel method is used. The graver (often called a chisel in this context) is shorter and held in a different grip, not pushed from the palm. It's struck with a lightweight, balanced "chaser's hammer." Each tap of the hammer drives the graver forward, creating a powerful, deep cut. It's a percussive technique that requires a different rhythm and skill set but yields bold, dramatic results.
Five common rookie mistakes
Most beginners make them. Avoid these common pitfalls and your journey to graver mastery will be much smoother.
- Heel Too Steep or Too Shallow: A heel that is too steep (a high angle) will make the graver jumpy and hard to control. A heel that is too shallow (or non-existent) will cause the tool to dig in and plough, getting stuck in the metal. The 15-degree heel is a good starting point.
- Point Too Thin and Acute: In an effort to get a super-fine point, it's easy to grind the belly angle too low (e.g., 35 degrees). This creates a weak, thin point that will snap the moment it encounters any real resistance. A 45-50 degree belly angle is much more robust.
- No Belly Polish: You've sharpened your graver on a 1200-grit stone and it feels sharp to the touch, but it drags in the cut. This is because of the microscopic burr left on the edge. Polishing the belly and heel on a finer abrasive to a mirror finish is non-negotiable for a smooth cut.
- Trying to Engrave Non-Annealed Metal: You try to cut a line and the graver just skates across the surface, or worse, the tip snaps. Precious metal becomes work-hardened very quickly. Always ensure your workpiece is fully annealed (softened by heating and quenching) before you begin engraving.
- Working on an Unsecured Bench Block: Your workpiece must be held absolutely rigid. If it can move, it will. A slip will not only scar your piece but can also send a very sharp piece of steel into your hand. Use a proper bench block, shellac, or an engraver's vice to hold your work securely.
UK-stocked: fast dispatch
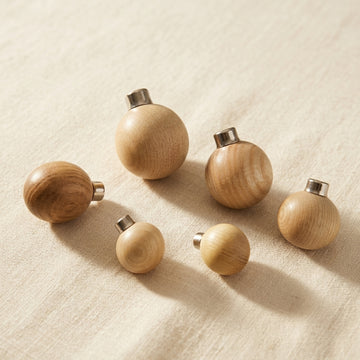
Mastering the hand graver is a journey, but it starts with the right equipment. Toolsmith does not currently sell graver blanks, diamond plates or sharpening jigs; we stock ball-shaped wooden graver handles, shown below. Everything we sell ships from UK stock, and we aim to dispatch orders placed before 2pm UK time, Monday to Friday, the same working day.
Related guides
- Filing Like a Pro: A UK Bench Jeweller's Guide to Hand Files
- Polishing Compounds Demystified: Tripoli, Rouge, White Diamond
- Setting Up a Jewellery Bench: 12 UK Essentials
- Shop all Files & Engraving Tools
Frequently asked questions
Which gravers should I buy first as a bench jeweller?
Start with three Glardon-Vallorbe HSS blanks — an onglette No. 2 for bright-cutting and fine lines, a flat No. 40 for clean-up and crisp edges, and a knife No. 2 for sharp V-grooves — fitted to mushroom handles. With a diamond plate and acrylic jig the kit costs roughly £90–£120, and round and square gravers can follow as your work demands.
How do I sharpen a hand graver?
Use the 45/15 rule: grind the belly (cutting face) at about 45 degrees, then lift to roughly 15 degrees to create a tiny heel behind the point — without a heel the graver jams. Work through diamond plate grits, then polish belly and heel to a mirror finish on an Arkansas stone or diamond film; the leftover burr otherwise drags in the cut.
Why does my graver skate across the metal or snap?
Skating usually means the workpiece is work-hardened — anneal it before engraving — or the heel angle is wrong. Snapped tips come from grinding the belly too acute (below about 45 degrees leaves a weak point) or from an unsecured workpiece shifting mid-cut. Hold work rigid in a bench block, shellac or engraver's vice, and keep the point robust.